Thrive Ultimatum Review 2024: Get More Sales With Timed-Offers

Welcome to our Thrive Ultimatum review.
Timed-offers are one of the most effective ways to increase sales. The problem? Most landing page & opt-in form tools don’t support them.
There are a couple of cloud-based platforms that do but they’re incredibly expensive.
This is where Thrive Ultimatum comes in – a WordPress plugin that it easy to share timed-based offers via CTA’s on your website.
In this Thrive Ultimatum review, I’ll show you exactly how to deploy timed-offers on your website, and create campaigns that dramatically increase sales.
What is Thrive Ultimatum?
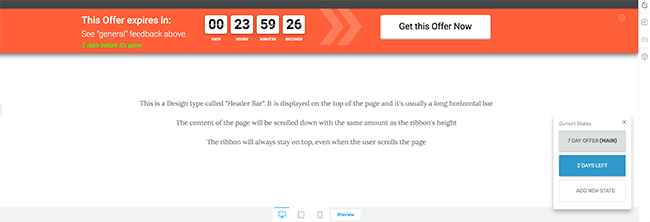
Thrive Ultimatum is the ultimate urgency marketing tool for WordPress.
Its key goal is to create a sense of urgency on your landing pages and website that drives people to do what you want them to – which is to convert.
With this plugin, you can take advantage of various types of timed-offers, including:
- Fixed date campaigns
- Auto-recurring campaigns
- Ongoing evergreen campaigns
What’s more, you can lockdown campaigns to display only to people who have access to your offer. Plus, it has the power to ensure any countdowns stay true to the user even if they switch out to another device.
Couple this with effortless drag and drop design and detailed tutorials built right into the plugin, your campaigns could be converting in no time at all.
Creating a campaign in Thrive Ultimatum
Thrive Ultimatum allows you to create multi-page campaigns right out of the box.
After you’ve activated the product within WordPress, head to the Thrive Ultimatum dashboard. This is where your campaigns are listed after you’ve built them.
To help you get started, click the Quick Start Tutorial Link or follow the instructions below.
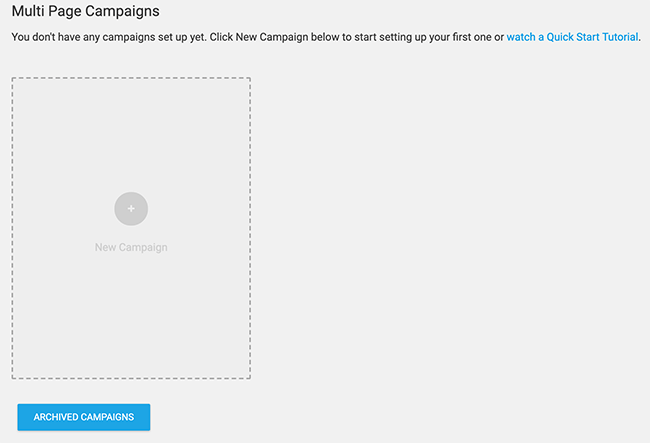
First, click New Campaign.
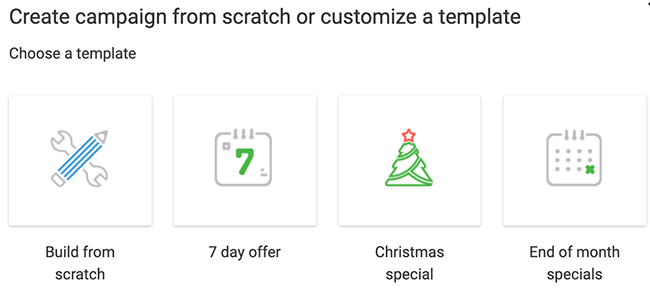
This opens a lightbox offering you 4 choices of templates to choose from.
- Build from scratch – No predefined settings.
- 7-day offer – An Evergreen offer triggered when a user first visits the site. 3 days before the end, the state changes to show the offer has 3 days left.
- Christmas special – Triggers on a specific start and end dates. When there are 2 days left, the state changes to reflect the limited time before the offer expires.
- End of month specials – Triggered to start on a certain day of the month and lasts for 2 days.
For this example, let’s choose the 7-day offer. This an option that comes with a pre-made trigger and timeline event design.
Once you’ve given the campaign a name, you’ll see the following page. This is where you can change settings, manage your designs and more.
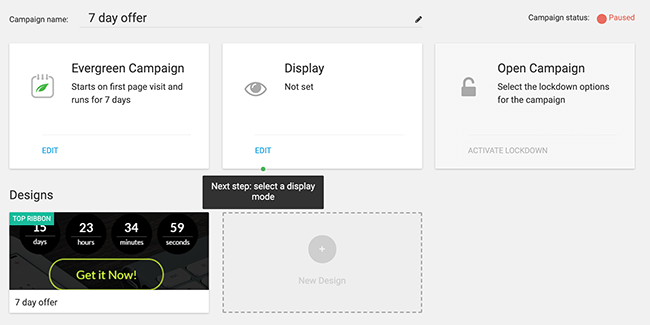
Display settings
The next step is to choose the display mode for your campaign. Click Edit in the Display box. You will see the following lightbox.
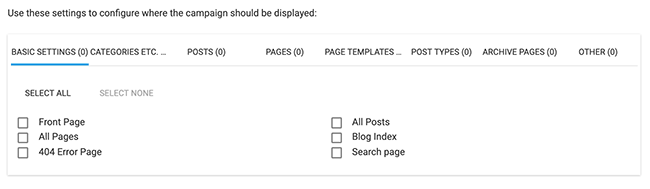
The display settings relate to where your campaigns are visible on your site.
You can choose from:
- Basic settings
- Categories and tags
- Posts
- Pages
- Page templates
- Post types
- Archive pages
- Other
This provides a lot of flexibility. To keep things simple let’s choose All Pages from the Basic Settings tab, which will display our campaign on all of the website pages.
Choosing a design and template
Thrive Ultimatum comes with drag and drop design functionality and professional looking templates. This makes it so much easier to quickly design your campaigns – especially if you have limited time.
To choose a design click the pencil icon on your current design.

A new window will open with a preview of your campaign design and the option to edit. You can even change the template by clicking on the cloud icon in the right toolbar.
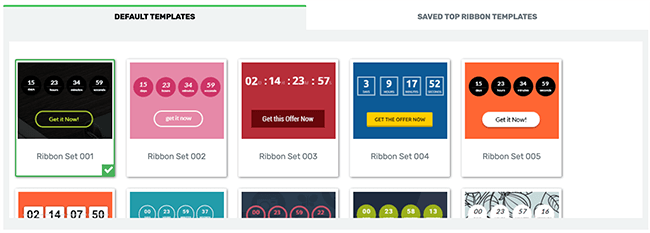
When you’re happy with your design, click on Save and Exit to return to your campaign settings.
Creating new states
In the next section, we’ll cover managing timeline events, where you can insert events into the timeline. This is achieved by using a different state of your campaign design. So let’s cover states in a little more detail.
To give you an example, if you want your campaign to change its display to highlight that there are only 2 days left, you would need to create a new state.
To create a new state, click the green plus icon at the bottom of the design editor screen. Click Add New State.
Give the state a name and click Save.
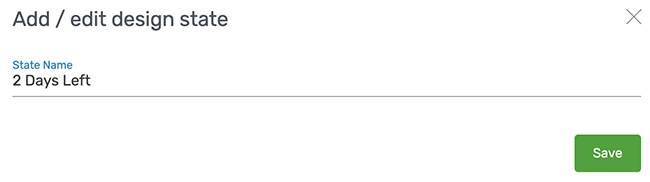
You can now work on a duplicate version of your base design, and edit it to show the increased urgency.
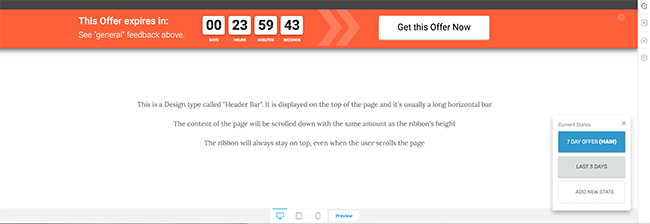
Managing timeline events
This brings us to the timeline system in Thrive Ultimatum. Through the timeline, you can change the different states of your campaign creative as I explained above.
These states further enforce the sense of urgency for those viewing it.
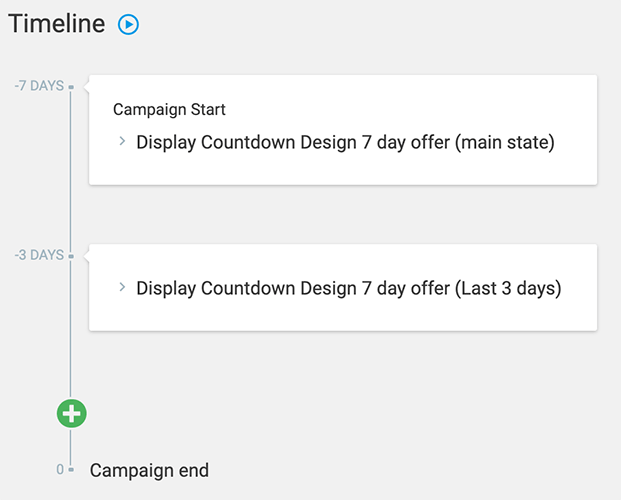
Because we chose the 7-day event for this example, Thrive Ultimatum automatically creates a 3-day state and timeline event, as well as the main state.
To add the 2-day state we created earlier, click the green plus icon on the timeline to add a new event.
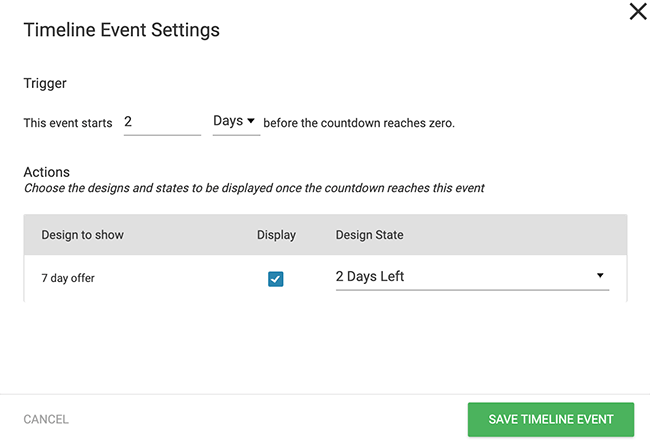
A lightbox similar to the one above will appear. In the design state dropdown, select the 2 days left state and ensure the display box is checked.
You’ll also need to type how many days before the event starts. In our case 2, but for other campaigns this can also be hours.
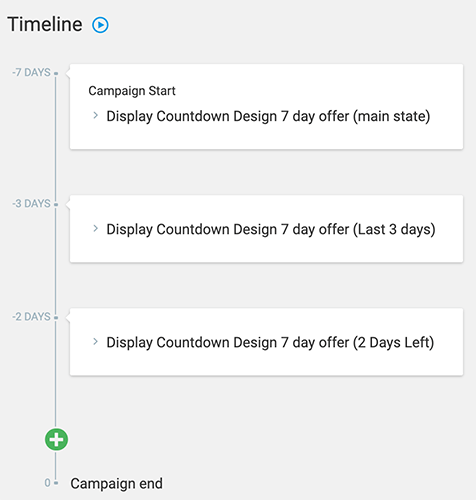
After you’ve saved, your timeline will look like this.
Adding conversion events
Conversion events are the actions visitors take on your website. In our case, we want people to get the offer we’re advertising, making the purchase the conversion event.
To add a conversion event, click the Add New button next to the conversion event heading.

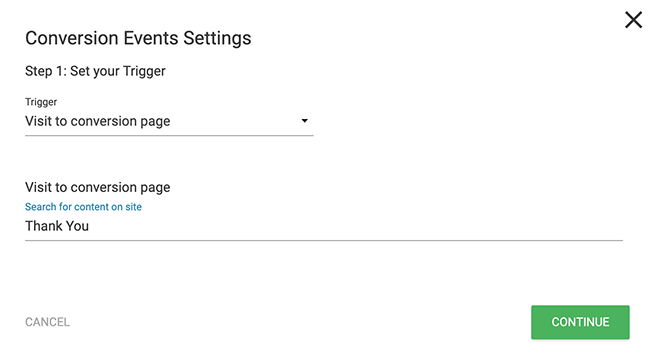
A lightbox will open asking you to select the event trigger.
Thrive Ultimatum is designed to work seamlessly with Thrive Leads for lead generation so when using them in tandem, you have more trigger options.
If you’re not using Thrive Leads, you have only one trigger option, which is ‘visit to conversion page’.
You then have the choice of choosing your conversion page. Usually, in the case of purchases and email subscribers, it’s the ‘thank you’ page.
Search for your page and click Continue.
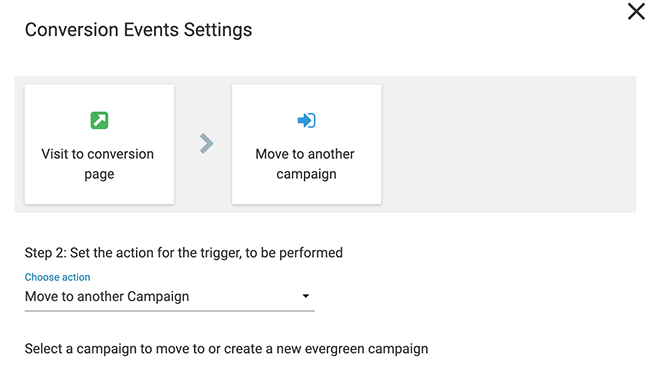
The next option is to choose what happens after a conversion event is triggered.
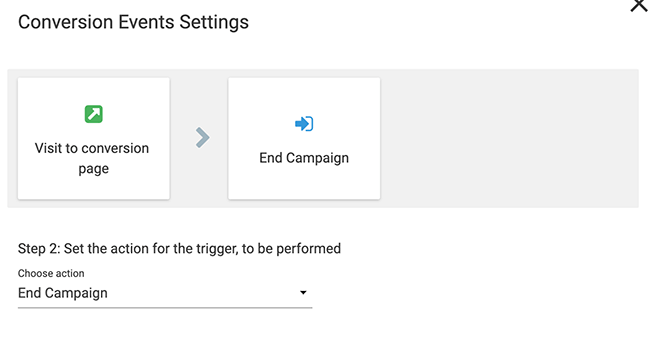
You can either end the campaign, which stops the campaign displaying to that visitor or you can show them another campaign.
For this example, let’s end the campaign and save.
Lockdown options
One other feature available with Thrive Ultimatum when setting up a campaign is the Lockdown setting.
A Lockdown campaign is one where only recognised visitors can access the promotion page. This is helpful if you have a sales page that you don’t want anyone to visit before the start of your promotion. Or if you want to give access only to your email subscribers.
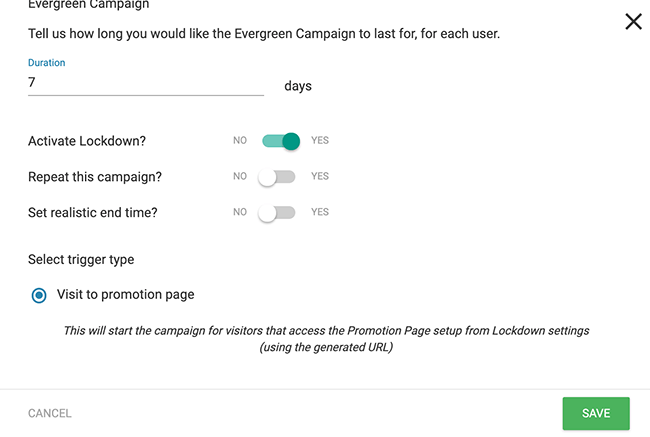
With this in mind, the lockdown features require the campaign trigger to be either a Thrive Leads Conversion (if you’re using Thrive Leads) or ‘Visit to Promotion Page’.
To activate the Lockdown settings for our evergreen campaign, click edit on the Evergreen Campaign box and select yes on the Activate Lockdown option. Under trigger type, select ‘Visit to promotion page’ and click save.
Now you need to choose the campaign pages for the lockdown. Click Edit on the Lockdown Campaign box.
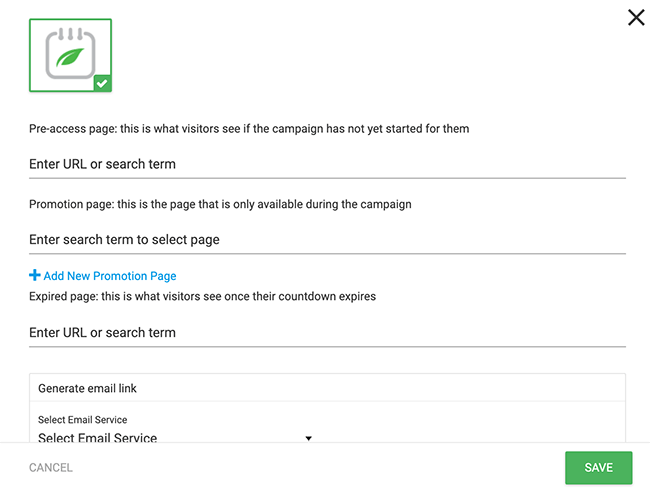
You should see an image like the above.
Here we can add the pages visitors will see before, during and after your campaign.
- Pre-access page: Here you can choose a page visitors will see before your campaign has started. A good option would be a landing page explaining the upcoming campaign to generate interest.
- Promotion page: This is where visitors will see your promotion. It is only viewable during the campaign.
- Expired page: Visitors will see this page when the promotion has ended.
Further options include the ability to generate an email link. This will allow only subscribers to view the promotion page.
The plugin automatically creates a link which you can paste into an email to send to your subscribers. When they click the link, they’ll be directed to the campaign.
When you’re finished, click Save.
Publishing your campaign
With your campaign setup, you can publish it in one of two ways.
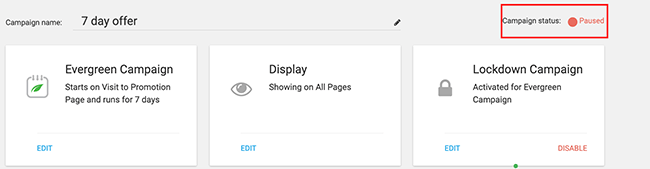
From the campaign settings page, click the red circle next to ‘Campaign status’. It will turn it green to indicate publication.
Or, from the Thrive Ultimatum dashboard click the red circle. Again, it will turn green to indicate that the campaign is live. You click it at any time to pause the campaign.
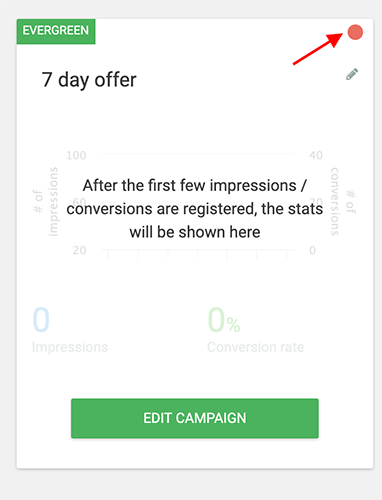
In the dashboard view for Thrive Ultimatum, you will be able to see the statistics for your campaign on its card after it’s started and conversions have been noted.
Who can benefit the most from Thrive Ultimatum?
In my opinion, Thrive Ultimatum has something to offer every type of WordPress website owner, with differing levels of involvement for each.
For casual bloggers like me who have limited time but want to make the most of offers and events for our readers, Thrive Ultimatum’s basic set-up options are simple to work with and are more or less ready to go with a few tweaks.
Established site owners with more detailed needs can benefit from every area of the plugin. The Advanced Evergreen campaigns would really come into their own here, with some patience and planning.
Thrive Ultimatum pros and cons
Pros
- Easy to use drag and drop design
- Versatile design types
- Powerful countdown timers
- Lockdown features for exclusivity
- Different design states based on time left on timers
- More functionality than other scarcity/urgency plugins
Cons
- Missing some of the more general lead generation/opt-in form functionality, however that can be easily integrated with Thrive Leads (both are included if you opt for Thrive Suite).
- Advanced features require more time to set up
Thrive Ultimatum pricing
For a 1 site license Thrive Ultimatum is $99/year and renews at $199/year thereafter.
However, for better value, you can get access via the Thrive Suite which costs $299 for the first year, renews at $599 each year after. Quarterly plans available at $149.
Other plugins in the suite include:
- Thrive Leads – Deploy, test, and optimize opt-in forms.
- Thrive Ovation – Collect testimonials on autopilot.
- Thrive Architect – Build custom page layouts, and landing pages.
- Thrive Optimize – Run A/B split-tests for your Thrive Architect landing pages (add-on).
- Thrive Quiz Builder – Create viral quizzes that get you traffic, social media followers, and email subscribers.
There are a bunch more, but these are some of my favourites. You can get a full rundown in our Thrive Suite review.
You get unlimited updates, unlimited support, and the ability to use all products on up to 5 websites. An agency license is available if you have clients.
This may seem like overkill if you only plan to use this one tool, but even if you were to use this one tool, it would work out far cheaper than a comparative cloud-based tool. Especially considering that there are no limits to traffic, leads, or conversions.
Thrive Ultimatum review: Final thoughts
When it comes to the fear of missing out, the Thrive Themes team has managed to bottle it into a single powerful plugin that is so feature-packed, it truly rivals most other offerings out there.
Both beginner and more experienced WordPress users will find Thrive Ultimatum excellent to work with and even if you don’t use every single feature available you can still experience the full benefits of scarcity/urgency marketing.
Overall, Thrive Ultimatum is another high-quality plugin from the Thrive Themes team that helps you get the most out of your WordPress site.
If you want to increase conversions and sales using timed-offers, why not give it a try?
Disclosure: Our content is reader-supported. If you click on certain links we may make a commission.