RafflePress Review 2024: Features, Pros & Cons, Pricing, And More

Welcome to our RafflePress review.
Running a Blog Giveaway is one of the best things you can do to boost your traffic, engagement and conversions. People love a freebie and a well-run giveaway has the potential to go viral, bringing in heaps of new readers to your blog in a short amount of time.
But organising a giveaway can be complicated. Which tool should you use to make things easier? What entry options should you include? Should you host your giveaway in a blog post or on a landing page?
There’s a host of giveaway plugins on the market claiming to make giveaways a breeze. But how does RafflePress stand up by comparison? Let’s find out…
RafflePress Review: Viral giveaways made easy

RafflePress is a comprehensive WordPress plugin that makes creating viral giveaways on your blog super easy.
Created by the team behind SeedProd, it’s packed full of great features that helps turn your blog visitors into brand ambassadors. As a result, you’ll have the potential to get more blog traffic, email subscribers and social engagement.
That’s all without having to buy ads.
With RafflePress you can create giveaways in minutes, instead of spending hours perfecting every detail. Goal-based templates provide the perfect environment for giveaways that achieve your marketing goals faster. And, verified bonus actions can drive real engagement on social media.
RafflePress also integrates with a host of email marketing services, as well as Zapier to connect to even more apps.
Essentially it’s the ideal recipe to: grow your email list, increase engagement and generate more sales.
How to run a giveaway with RafflePress
Let’s go over how easy it is to set up and start running a giveaway with RafflePress. It’s a lot easier than you think!
Step 1. Add a new giveaway

After you’ve uploaded and activated the RafflePress plugin, head to the RafflePress dashboard. This is where you’ll get a complete overview of all your giveaways once they’re published.
To create a new giveaway, click Add New.
The following screen will open showing you 8 template options.
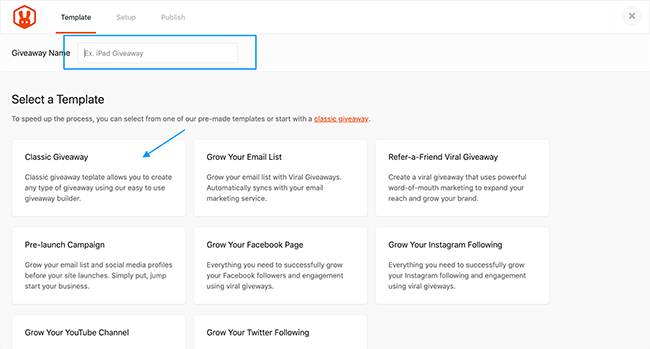
Each of these templates are pre-made with a specific marketing goal in mind including:
- Grow your email list
- Refer-a-friend viral giveaway
- Pre-launch campaign
- Grow your Facebook page
- Grow your Instagram following
- Grow your YouTube channel
- Grow your Twitter following
- Classic Giveaway.
To provide details of all your options, I’m going to use the Classic Giveaway template for this review. So give your giveaway a name and select the Classic template.
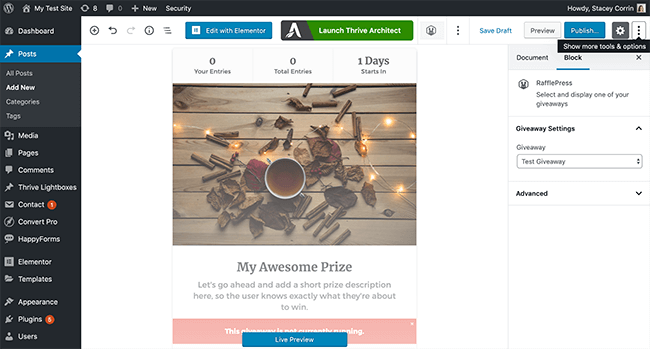
Step 2. Set the giveaway details
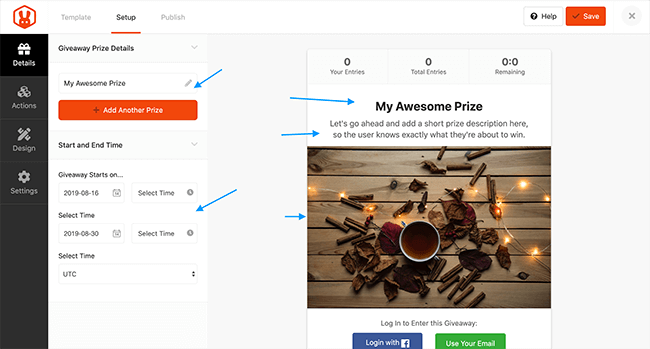
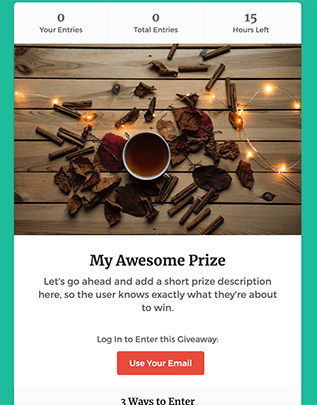
This is the next window you’ll see after choosing your template. Here you can fill in the details of your prize. The widget to the right is a preview of what your giveaway will look like to your visitors.
First, give the contest a name. Then add the details of the prize/s that’s up for grabs. Include a short description to provide more information to entrants and be sure add an eye-catching image of the prize.
Then add the start and end dates and times of your contest. Doing so will reveal a ‘time left’ countdown on the widget for visitors to view.
Step 3. Add actions and entry options
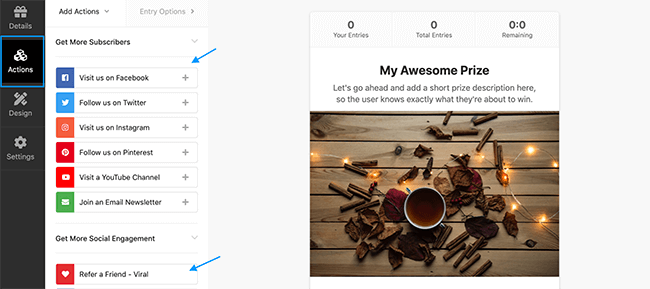
With the prize details in place, the next step is to add the actions people can take in order to enter the giveaway. Click Actions in the left sidebar as highlighted above. You’ll then see a list of actions organised by goals.
These goals are to:
Get more subscribers
- Visit on Facebook
- Follow on Twitter
- Visit on Instagram
- Follow on Pinterest
- Visit a YouTube Channel
- Join an email newsletter
Get more social engagement
- Refer a friend – Viral
- View Facebook post/video
- View Instagram post/video
- Watch a video
Get more traffic
- Tweet a message
- Visit a page
- Answer a question
- Invent your own
Let’s add one from each Goal section as an example.
Get more subscribers – Join a mailing list
To add the Join a Mailing List action, click it in the action list to reveal the following options.
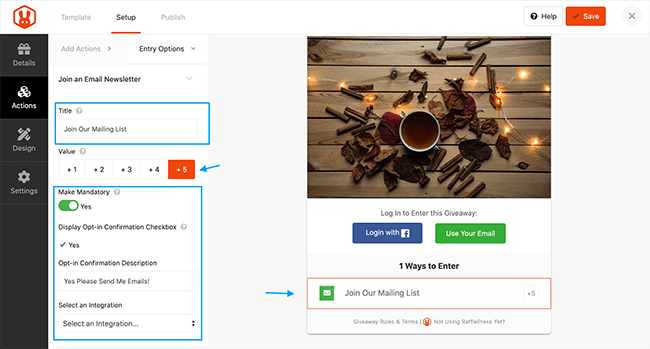
Here you can give the action your own label and entry value. The entry value is how many extra entries visitors will get for performing this action.
You have the option to make this action mandatory and include an Opt-in Confirmation checkbox – something that’s incredibly useful for GDPR compliance.
Next select which email marketing service you’d like to integrate with. You can choose between:
- ActiveCampaign
- AWeber
- Constant Contact
- Drip
- HTML Webform
- MailChimp
- Zapier
Social engagement – View a post on Facebook
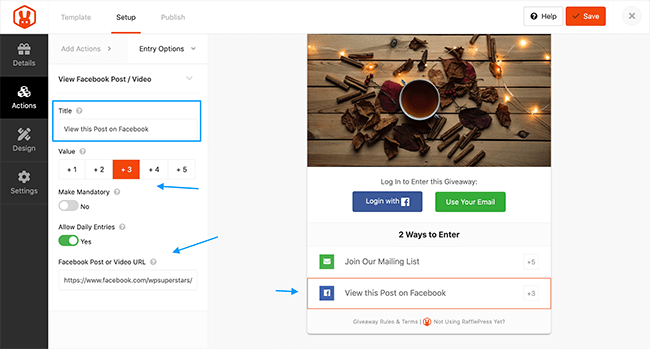
For the Social engagement, action let’s see how to set up the View a post/video on Facebook action. Click the action to reveal the following screen.
This action directs visitors to a specific post or video on your Facebook Page. Choose a label for the action and add an action value. You can also choose to make it a mandatory option and whether to allow daily entries. Then paste in the desired facebook post or video URL and click Save.
Get more traffic – Tweet a message
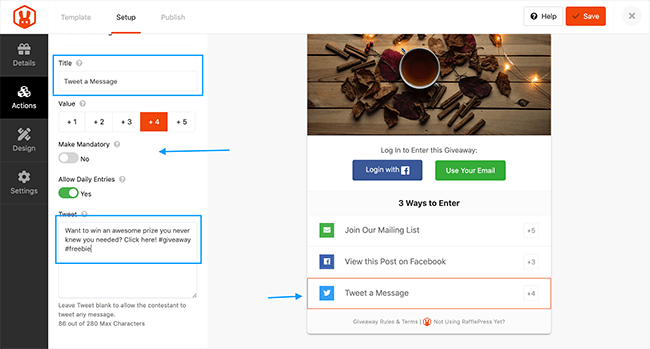
This action prompts a visitor to tweet a predefined message to their followers. Click the action to open up the options screen.
Give this action a label and assign a value. Decide if this is a mandatory option and if you want to allow it to be a daily action for more entries. Then craft a message that visitors will tweet when performing this action.
Step 4. Customise the design
Now it’s time to play with how the giveaway widget will look in the wild. To customise the design of your giveaway, click Design in the left sidebar.
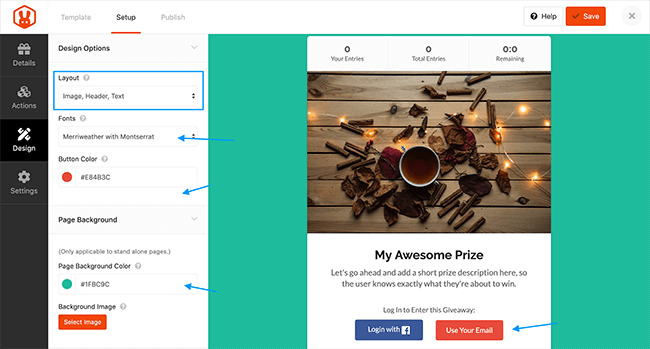
The design options are simple and very easy to use. You can swap the layout to show the image at the top of the widget, before the text and vice versa. There are also 10 complimentary font pairings to ensure headings and descriptions look smart and in harmony with each other.
Controlling the button colour of the email login option is easy. Click to choose a colour or paste in your own hex value. And if you’re going to be displaying the widget on a landing page, you can control the background colour in the same way.
Lastly, you have the option to upload a background image. Click save when you’re ready to move on to the next section.
Step 4. Determine your settings
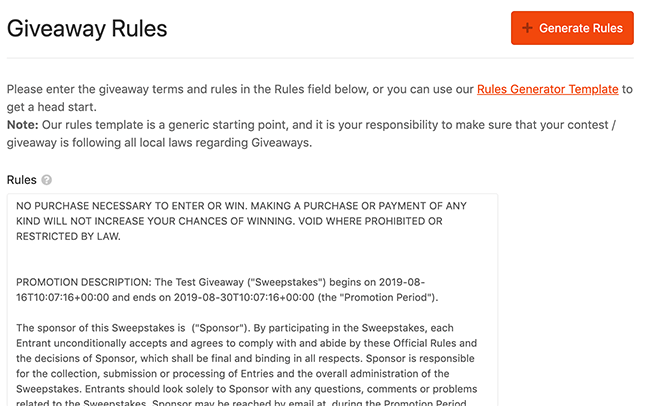
The settings options are where you can set terms, verification and tracking info for your giveaway. For setting up the terms and conditions, RafflePress has a handy generator which asks a few questions in order to generate accurate terms and conditions.
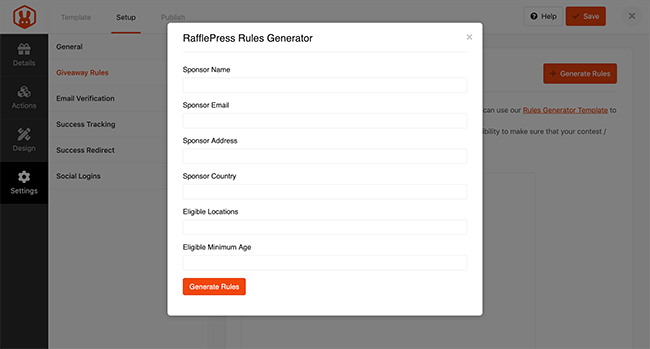
All you need to do is fill in the relevant details and click Generate. The content box will automatically fill with professional terms.
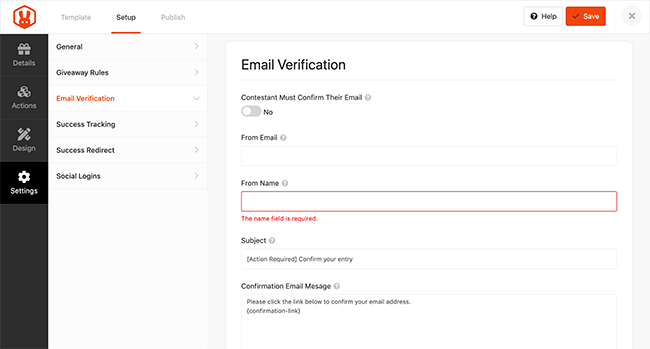
To add an extra layer of security to your giveaway you might want to consider making entrants verify their email address first. This can help reduce spam entries. To do this, click Email Verification and fill in the field below, and click Save.
The Success Tracking option is important if you are using a landing page to display your giveaway. Here you can add your Google Analytics tracking script and retargeting pixels.
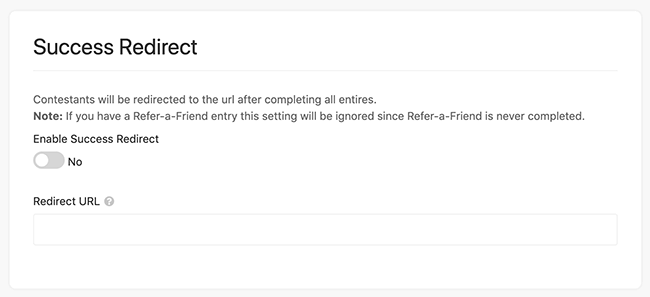
Success Redirect provides the option to redirect giveaway visitors after they’ve entered your contest. Simply paste the desired redirection URL and click save.
The final setting is Social Logins. Enabling this option, let’s visitors sign in with their Facebook account.
Step 5. Publish your giveaway
You can publish your giveaway using one of 3 options:
- The RafflePress WordPress block in the Gutenberg editor
- A giveaway landing page
- With a WordPress shortcode
Let’s look at how to publish using the Gutenberg block first.
Create a new post for your giveaway. After adding the Title and content for the post, click to add a new block. In the search bar, search for RafflePress.
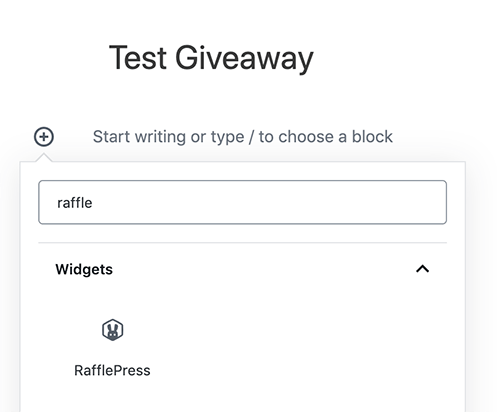
Click to add the block to your post. A drop-down box will appear where you can choose the giveaway you previously set up. Click it and the RafflePress widget will populate as shown below.
When you’re happy with your post, click Publish.
To set your Giveaway up as a Landing Page, edit your giveaway, go to settings and click General. Under the Permalink options, give your landing page a URL.
Navigating to the URL will show you your giveaway. You can use this page URL to promote your contest.
That’s it, your giveaway is live and ready for its first entrants!
And finally, to find the shortcode you’ll go to your list of giveaways, click Embed and select Shortcode. That will reveal the shortcode which you can then copy and paste into any page or post on your site.
RafflePress pricing
RafflePress has 4 price tiers based on your blog needs. There is also a Free plugin, RafflePress Lite with all the basic features, but for the full package, premium is where it’s at. Here’s how the premium pricing looks:
- Plus: $39.50/year (introductory price)
- Pro: $99.50/year (introductory price)
- Growth: $199.50/year (introductory price)
- Ultimate $499.50/one time
The higher the plan, the more sites you can install RafflePress on, and you also get access to more features.
All plans come with a 14-day money back guarantee.
Pros and cons of RafflePress
Pros
- Drag and drop builder
- 1-click entry and fraud protection
- The power to create viral giveaways
- A great range of entry actions
- Easy to use and setup – no design knowledge needed
- Professional terms and conditions generator
- The option to display giveaways as a landing page
- 100% mobile friendly
- Zapier integration
Cons
- A limited number of email integrations
Is RafflePress the best WordPress giveaway plugin?
Having had the chance to run my own giveaway with RafflePress recently, alongside putting together this review, I can honestly say that is the best contest plugin I’ve used to date.
The setup options are so simple, with easy to follow instructions, that even novice bloggers would have no problem using. Couple this with a clean, modern design and integration with the likes of Zapier, the power of viral giveaways are right at your fingertips.
What’s more, with a few clicks you can have your contest appear on a custom, distraction-free landing page that’s primed for conversions.
There are a bunch of older giveaway plugins on the market but nothing else we’ve tried comes close to RafflePress.
Disclosure: Our content is reader-supported. If you click on certain links we may make a commission.