How To Add 301 Redirects In WordPress And Avoid 404 Errors

If you have ever changed a URL on your website, or your permalink structure without adding redirects you could have a serious problem on your hands.
But why is this a problem?
Changing URL’s without adding redirects causes problems with search engines like Google, it stops them from indexing your content and can impact your rankings.
It’s also a huge problem for users – if they find a broken link then that’s a lost opportunity for you and it’s frustrating for them, they may never return.
So, you need to add redirects to let users and search engines know what the new URL is, but how do you do this in WordPress?
There are two ways to add redirects in WordPress, you can add them manually or you can use a plugin.
In this post we’ll take a closer look at both methods so you can avoid any of those pesky 404 errors!
We’ll be talking about adding permanent redirects specifically, these are also known as 301 redirects.
Adding redirects in WordPress manually
In order to edit redirects manually, you have to edit your .htaccess file.
It’s important to note that you make a backup of that file BEFORE making any changes. If you make a mistake editing your .htaccess file, it can bring your entire site down.
Therefore download the original via FTP in order to have a backup. That way, even if you make a mistake you can easily upload the backup and avoid any problems, as well as correcting the mistakes.
Also keep in mind that editing your .htaccess file is only available if you have Apache server.
Having said that let’s see how to add redirects by editing your .htaccess file.
In this case all you have to do is add the new location to it by using the following line of code:
Redirect 301 /oldpage.html http://www.yoursite.com/newpage.html
Redirect 301 /oldpage2.html http://www.yoursite.com/folder/
This will redirect a single page or a single folder to the new location. If you want to redirect the entire website because you changed the domain name for example, simply add this to .htaccess file:
Redirect 301 / http://newsite.com/
This will maintain your links intact so http://www.oldsite.com/hello-world will become http://www.newsite.com/hello-world.
It’s also possible to redirect a page with PHP itself. If you ever need to redirect a PHP webpage that is outside your WordPress install then all you need to do is add the following line to your header:
[php]header("HTTP/1.1 301 Moved Permanently");

header("Location: http://www.yournewwebsite.com");[/php]
The line Moved Permanently is necessary for search engines to understand that they are dealing with a permanent 301 redirect. It’s also advisable to put this at the very top of your header file to make sure the redirection is working as intended.
Adding redirects using a plugin
As always, you can use a plugin to add redirects. One of the best plugins for the job is definitely Redirection.
It may seem intimidating at first glance but it’s well worth spending a few minutes and getting familiar with the plugin.
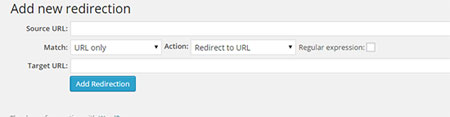
In reality adding a redirect is as simple as setting the source URL – the one that’s throwing up the infamous 404 error and entering the correct link in the target URL field, as shown in the screen shot below:
One of the things I like best about this plugin is the statistics page which allows me to see how many times a certain link has been accessed, who tried to access the link, where they found it and when it last happened.
This feature also comes in handy if you want to monitor how many times a specific link has been clicked – in this case you would have to enter the link as a redirection and then set the plugin to do nothing.
It’s a nifty way to track how many times a download link has been accessed or even an affiliate link.
Another cool feature of this plugin is the fact that you can group your redirects and have them organized together.
For example if you use affiliate links on your blog, and you want your user to see:
http://www.yourawesomeblog.com/recommends/affiliate instead of http://www.yourawesomeblog.com/ugly-affiliate-link-here
You can set those up with this plugin and group them together under Affiliate Links for easier control.
You could also use the 301 Redirects – Easy Redirect Manager plugin by WebFactoryLtd. It also has a premium version available with additional features.
Alternatively you could use a plugin designed specifically to redirect affiliate links, like ThirstyAffiliates.
Important note regarding the Redirection plugin: ensure log tracking is turned off in the settings as this can put unnecessary strain on your server.
Other types of redirects
In this tutorial we’ve talked specifically about adding 301 redirects, these are known as permanent redirects, but there are other types of redirects that are considered temporary.
Temporary redirects are usually used more for ecommerce sites, particularly when products go out of stop.
That way search engines can be instructed that a URL is only temporarily unavailable.
Moz has a good resource which explains this in more depth, read it here.
Conclusion
As you can see there are various methods to add redirects in WordPress.
Adding them manually via the .htaccess file is the best approach as it minimizes the impact on your server, however using a plugin is definitely easier.
Adding them correctly can improve your SEO and even bring old posts back to life and show ensure your visitors are having a positive experience on your website.